

The Transducer Mounting Decision: More Than Just a Bracket
For commercial fishing guides, rental fleet operators, and serious anglers, the question of how to mount a fish finder transducer on an inflatable kayak is not a simple DIY afternoon project. It is a critical specification decision that affects sonar performance, hull integrity, and on-water reliability. A poorly mounted transducer can yield garbled readings, create a persistent drag source that hampers paddling efficiency, or worse, compromise the structural integrity of a drop-stitch chamber.
Unlike rigid-hull boats, the inflatable kayak's flexible hull presents a distinct set of challenges. The primary goal is to achieve a stable, bubble-free, and level transducer face that maintains clear water contact across a wide range of speeds and conditions. This guide outlines the commercially accepted methods—from through-hull epoxy installations to scupper-mount systems and adjustable arm mounts—each with distinct performance tradeoffs, installation labor costs, and suitability for fleet operations.
Understanding Sonar Physics in an Inflatable Context
Before selecting a mount, it is essential to understand the physics at play. A traditional transducer sends and receives acoustic pulses (sound waves). For a reliable return, there must be an acoustically conductive medium between the transducer face and the water. Air is a poor conductor of sound waves relative to water or epoxy resin. Consequently, any air gap between the transducer face and the hull surface will scatter the signal, resulting in weak bottom returns or complete signal loss. The rubbery, air-filled nature of an inflatable kayak makes it acoustically opaque for through-hull applications unless a specific, solid epoxy coupling is used.
Additionally, the kayak's design speed and turning radius affect transducer placement. Installed too close to the stern, turbulence from the kayak's wake can create air bubbles that pass directly across the transducer face, causing "cavitation noise" on the screen. Installed too far forward, the transducer may leave the water entirely when the kayak planes or is lifted by a wave, resulting in erratic depth readings. The challenge is to find a "clean water zone" where the hull's design maintains laminar flow.
Method One: Through-Hull Epoxy Mount (Pseudo-In-Hull)
This method involves bonding the transducer directly to the interior floor of the kayak using a two-part epoxy. This is often favored for its clean exterior profile—no brackets protruding into the water—and its protection against snagging on debris.
Operational Considerations: The installation requires the hull floor to be completely dry and slightly rough to ensure adhesion. A common industry approach uses marine-grade, slow-cure epoxy to allow air bubbles to escape. A small dam (often made from modeling clay or epoxy putty) is built around the transducer to create a pool of epoxy. The transducer is then pressed firmly into the epoxy, ensuring no bubbles remain between the transducer face and the hull. The kayak must be stationary for the duration of the cure time (often 24 hours).
Performance Tradeoff: The primary signal loss for a through-hull install is approximately 3-5% of the signal strength, although this is highly dependent on the thickness of the PVC/TPU material and the specific sonar frequency. At 200 kHz, this loss is often negligible for standard depth readings (up to 120 feet). However, for high-frequency CHIRP sonar or side-imaging, this method is generally not recommended, as the hull will significantly attenuate the high-frequency returns, leading to poor image clarity. This method is best suited for basic depth and temperature readings in commercial rental fleets where durability is prioritized over detailed scanning.
Method Two: Scupper-Mount Bracket Systems
Many inflatable fishing kayaks feature factory-installed scupper holes—through-hull openings designed to drain water. Specialized transducer mounts have been developed to slot directly into these scuppers.
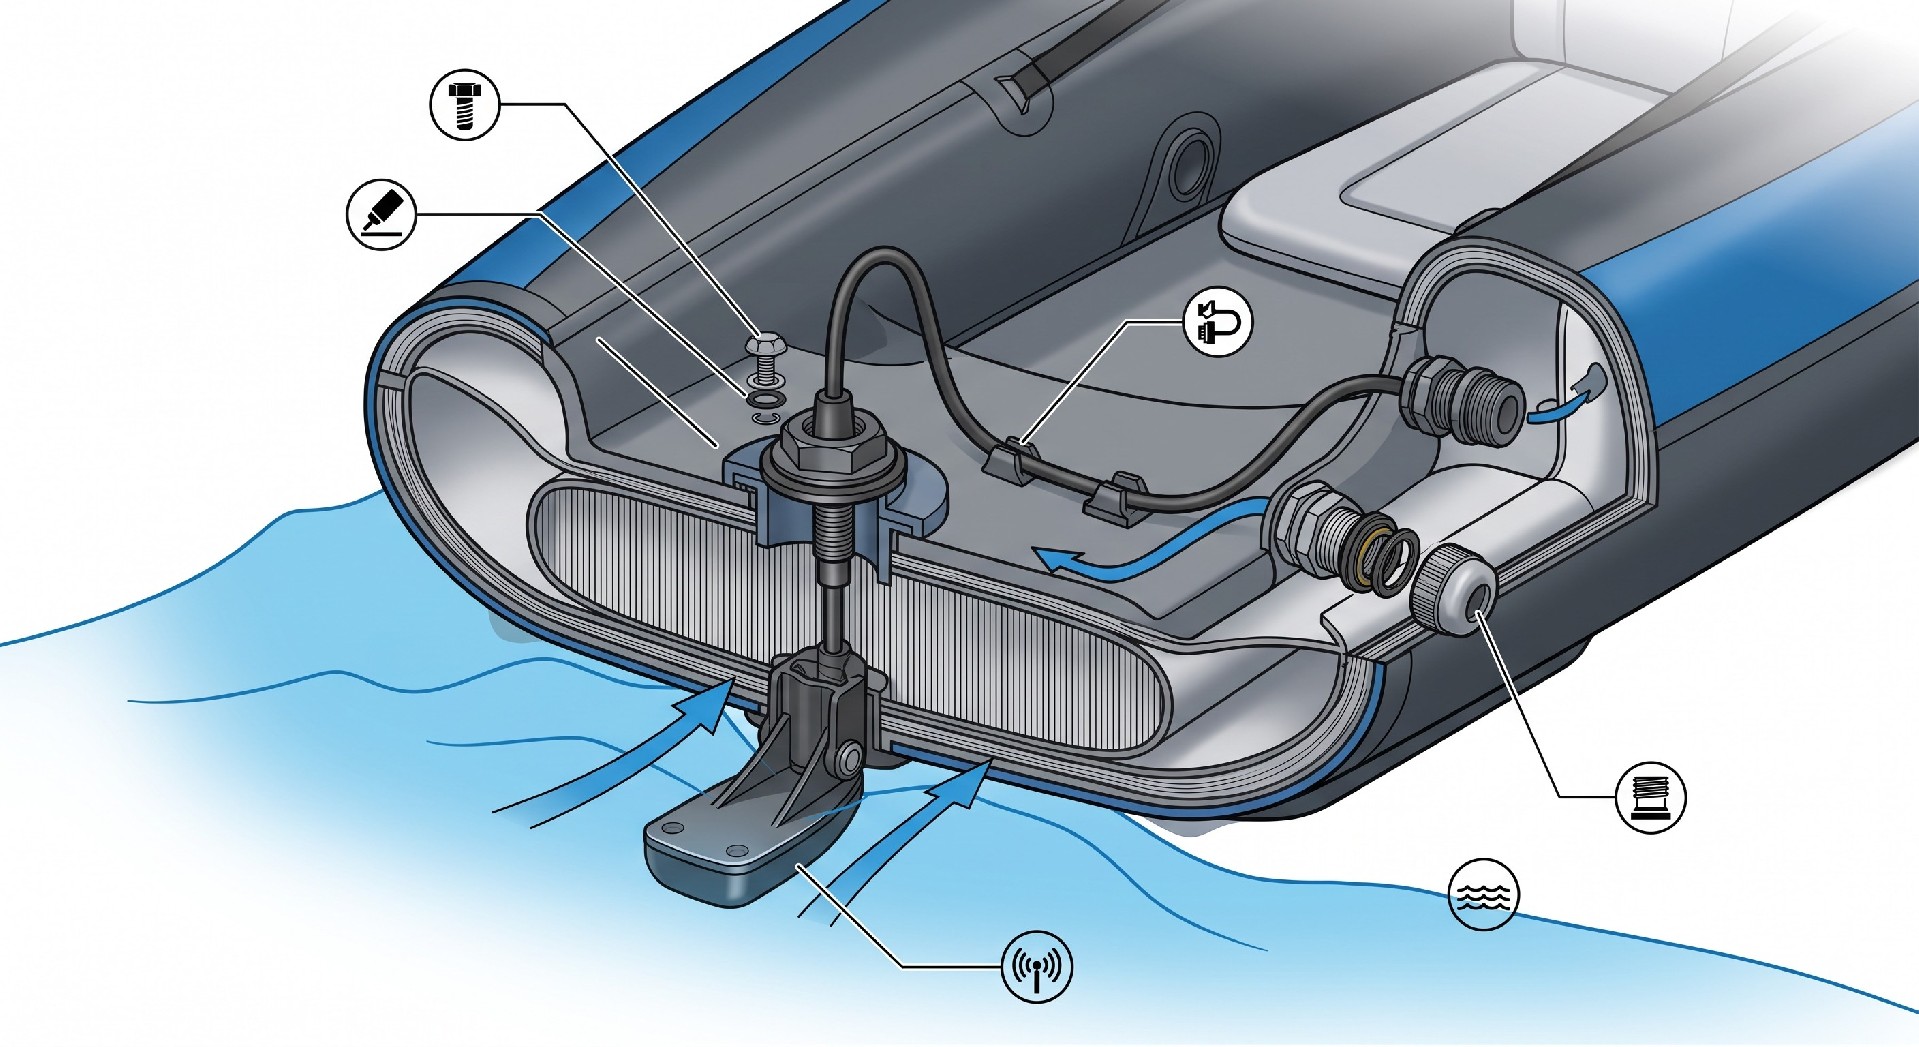
Engineering Details: These mounts typically consist of a plastic or marine-grade aluminum bracket that passes through the scupper and is secured with a threaded nut or pin on the inside of the hull. A padded or adjustable arm extends from this base to hold the transducer below the hull. The depth of the mount is often adjustable to ensure the transducer sits just below the lowest point of the hull, usually by 1-2 inches. The advantage of this system is that it provides direct water contact for the transducer, yielding near-optimal sonar performance with minimal signal degradation. It also offers excellent protection against dragging, as the scupper's location is usually within the keel's protective channel.
Buyer Check: This method relies heavily on the kayak manufacturer's design. The scupper hole diameter and thickness vary wildly. A 1-inch scupper is not a 1.5-inch scupper. Verify the bracket compatibility against the kayak's specifications before procuring. Furthermore, ensure that the bracket material (typically stainless steel or anodized aluminum) is compatible with the marine environment to prevent electrolysis or corrosion. For fleet operators, this is the premium option, albeit one that requires matching the mount to a specific hull design, limiting fleet flexibility if you run multiple kayak models.
| Mounting Method | Sonar Performance | Hull Modification | Fleet Flexibility | Estimated Labor Time |
|---|---|---|---|---|
| Through-Hull Epoxy (Pseudo-In-Hull) | Good (Low Signal Loss), Poor for Side-Imaging | None (Internal Bond) | Low (Permanent install) | 45-60 Minutes + Cure |
| Scupper-Mount Bracket | Excellent (Direct Contact, Minimal Turbulence) | Requires Scupper Compatibility | Limited (Model-specific) | 15-30 Minutes |
| Adjustable Arm Mount (Transom) | Excellent (Direct Contact), Susceptible to Surfacing | Glue/Strap on Mounting Plate | High (Transferable) | 10-15 Minutes |
Method Three: Adjustable Arm (Transom) Mount
This method utilizes the universal mounting bracket usually included with the fish finder, adapted for the inflatable kayak's transom (or rear deck). This involves attaching a PVC board, a wooden plank, or a specific aftermarket mount to the rear quarter of the kayak, providing a rigid surface to clamp the transducer onto.
Industry Application: This is the most versatile and commonly specified method for OEM aftermarket accessories. The process involves cutting a marine-grade plastic (HDPE) plate to fit the curvature of the rear chamber. This plate is then glued or strapped (using quick-release straps) to the kayak. The transducer bracket is then screwed into this plate. The height of the transducer must be adjusted so that it sits roughly 1/4 inch below the hull bottom when the kayak is stationary.
Performance Tradeoff: This provides direct water contact, ensuring excellent signal integrity. However, it introduces drag and a snag hazard. If placed off-center, it can induce a slight yaw effect while paddling. Additionally, in choppy water or when turning, the transducer may surface, causing the display to flash "lost bottom." While not ideal for detailed scanning, it is a robust, cost-effective solution for rental fleets that requires no modification to the kayak hull itself, preserving resale value.
Commercial Decisions: Signal Interference and Noise Control
Regardless of the mount chosen, the installation's mechanical integrity is only half the battle. The transducer cable must be routed to the battery and display unit. This is where most commercial installations fail.
Interference Sources: The transducer cable is exceptionally sensitive to electrical interference. Running the cable alongside the motor cables (if using a trolling motor) will result in severe line noise on the display. Maintain a minimum separation of 6 inches between transducer cables and other power lines. Furthermore, the cable should never be pinched between the kayak hull and a gear track, as this can crimp the internal wiring, permanently destroying the transducer's performance. When routing cables through bulkhead fittings, use a protective grommet.
Deployment Logistics: For rental operations, a quick-disconnect mount is often specified. This allows for easy removal of the entire fish finder and transducer during transport or storage, reducing theft and preventing damage during loading. A water-tight housing for the electrical connections is non-negotiable. Use dielectric grease on all connections and consider a sealed cable gland for any permanent through-hull cable passage.
[IMAGE_2]
Deployment Checklist: How to Verify the Installation
The final test determines the success of the installation. A static test is not sufficient. The kayak must be taken into the field.
Static Test: With the kayak stationary in water at least 10 feet deep, check for a stable depth reading. Watch for any "missing pings."
Dynamic Test: Paddle at varying speeds (cruise, sprint). Observe if the bottom reading drops out when the kayak accelerates or turns sharply.
Turbulence Check: At speed, check for continuous "streaks" of noise on the sonar display. This often indicates cavitation (air bubbles) hitting the face. Adjust the transducer depth or tilt angle downward by 2-3 degrees to rectify.
Leak Test: If a scupper or through-hull mount was used, pump the kayak to full working pressure (typically 2.5-3.5 PSI for recreational kayaks). Inspect the mounting area for leaks. A soapy water solution applied to the area will reveal even minute air leaks.
Design Engineer's Verdict: Selecting the Best Mounting Strategy
There is no single "best" mount. The choice is conditional on the use case and the buyer's commercial constraints.
Choose the Through-Hull Epoxy Mount when: You need the lowest drag profile for long-distance paddling, you are using a basic sonar/chartplotter, and the kayak is a permanent asset (not subject to frequent swapping).
Choose the Scupper-Mount System when: The kayak has a purpose-built scupper designed for it, you demand maximum sonar performance, and you are not concerned about cross-compatibility between different kayak models.
Choose the Adjustable Arm Mount when: You are managing a mixed fleet of kayaks, you need to quickly transfer units between kayaks, or you require high-frequency CHIRP imaging clarity that cannot be achieved through a hull.
For most commercial operations, the adjustable arm mount represents the best balance of performance, flexibility, and cost, offering the fastest installation and removal times and the lowest hull modification requirements. Always factor in the cost of waterproof cable management and the labor time to test and calibrate the system. A mounting job should never be left to chance; define the acceptance criteria before the first vessel hits the water.