

The Valve is Not a Lug Nut: Understanding Torque Limits
In commercial inflatable equipment, the air valve is one of the most frequently handled components. It is also one of the most frequently damaged components, often by the very people trying to keep the gear operational. The most common and costly mistake is over-tightening the valve cap or the valve core itself. Unlike a mechanical fastener, an inflatable gear valve is a precision seal designed to retain pressure against a flexible substrate. Applying excessive torque does not make the seal more secure; it deforms the seal, stresses the flange, and damages the bladder material.
For B2B buyers, rental fleet operators, and facility managers, this isn't just a maintenance nuisance. It’s a lifecycle cost driver. A damaged valve can render a high-value inflatable watercraft, marine platform, or shelter inoperable until repaired, causing downtime and reducing return on investment. This article explains the engineering reasons why over-tightening is detrimental and provides a practical torque management strategy for commercial operators.
Anatomy of a Seal: How Air Valves Maintain Pressure
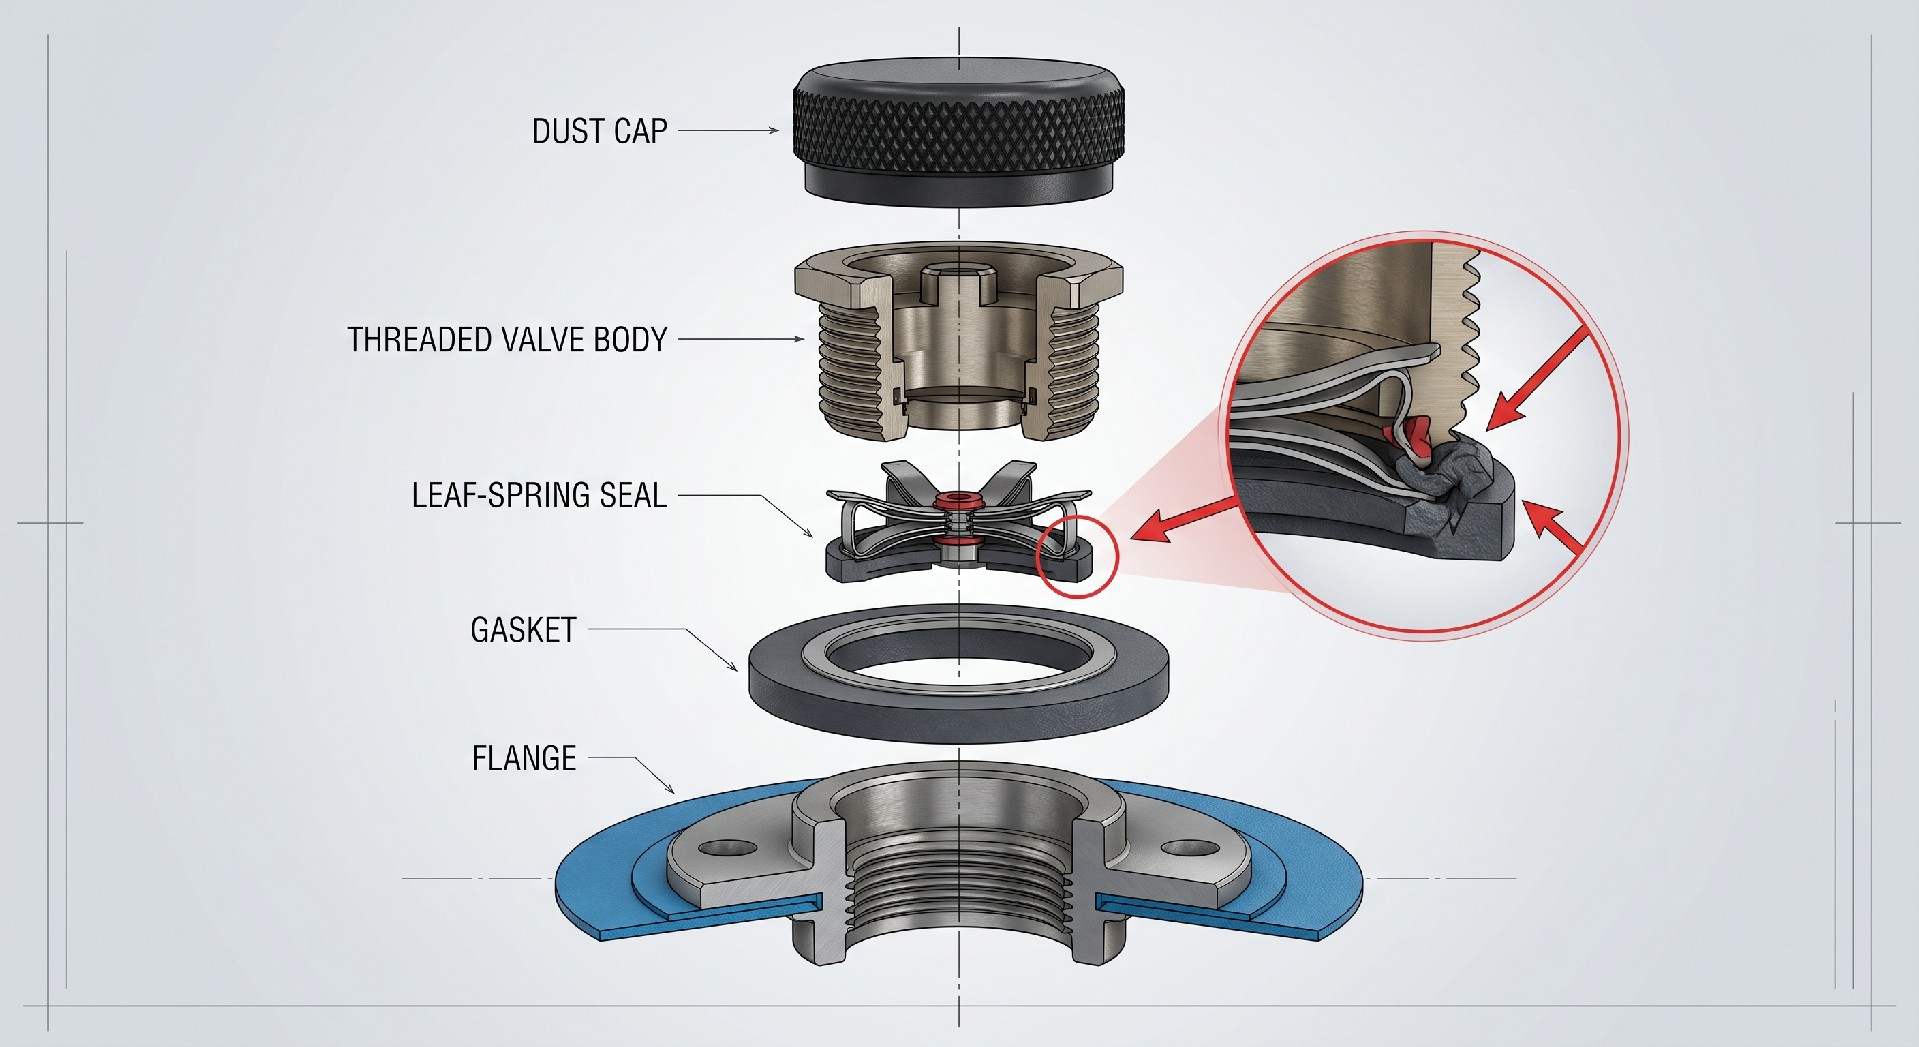
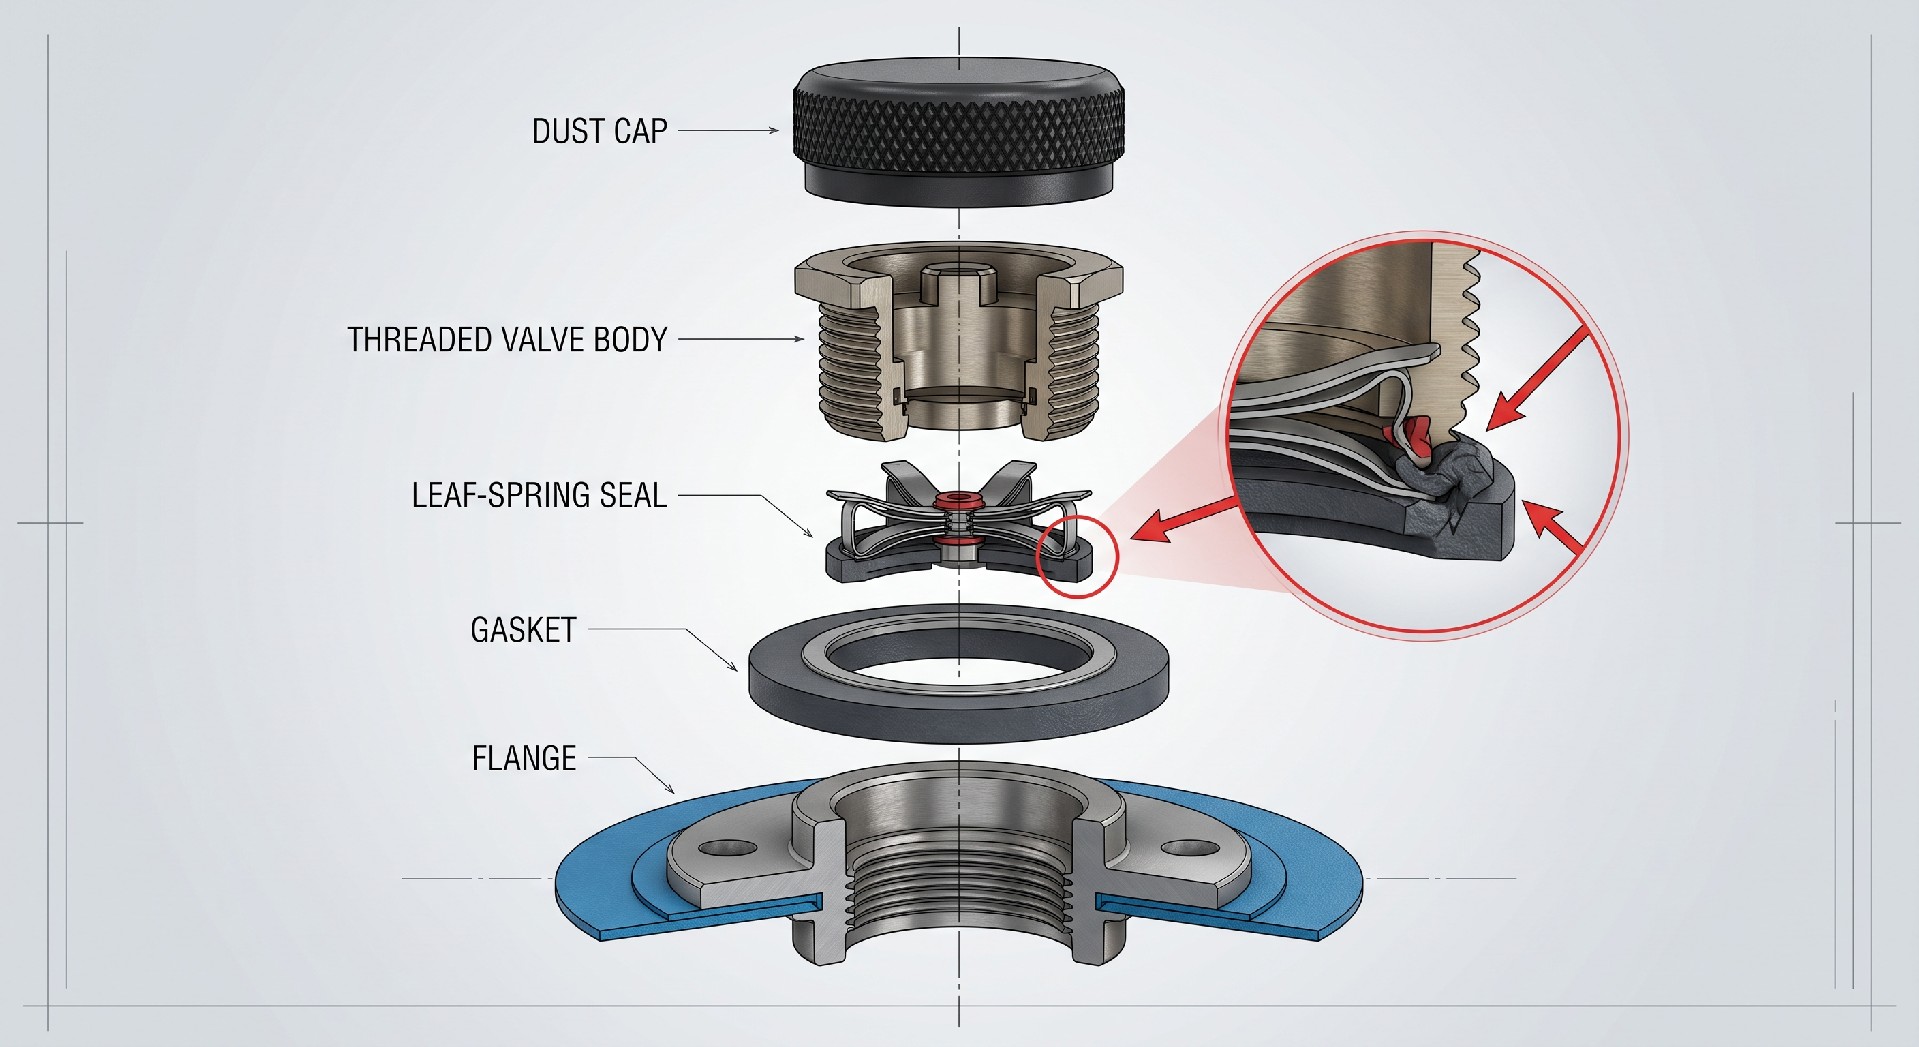
To understand why over-tightening is harmful, you must first understand how these valves work. Most commercial air valves, such as the popular Halkey-Roberts style or leaf-style valves, are not sealed by compression of the cap against the valve body. Instead, they use a spring-loaded diaphragm or a leaf-spring mechanism to create a one-way seal. The internal air pressure itself pushes the diaphragm against the valve seat, creating an airtight seal.
The cap serves two primary functions: it is a dust cover to keep debris out of the mechanism, and it acts as a secondary seal only in the event of a primary seal failure. When you tighten the cap, you are not increasing the primary seal's integrity. You are simply pressing the cap gasket against the top of the valve body. Overtightening can compress this gasket beyond its elastic limit, causing it to extrude or crack. This, counterintuitively, creates a leak path.
The Flange Interface Problem
The second critical point of failure is the valve flange—the wide base of the valve that is welded or glued to the fabric. Commercial inflatables, whether drop-stitch docks or high-pressure SUP boards, rely on a flexible bond. Excessive torque applied to the valve body or cap translates to a twisting or prying force on this flange. Over time, this can delaminate the valve from the fabric or create micro-tears at the edge of the weld. Once the substrate is compromised, the valve cannot maintain its rated working pressure.
Common Failure Modes from Excessive Torque
Field experience across various commercial equipment classes reveals specific failure patterns tied directly to over-tightening.
Seal Deformation: The rubber or silicone gasket inside the cap is compressed past its yield point, leading to permanent deformation. The result is hissing leaks that often require a full cap or core replacement.
Thread Stripping: Many valve caps and cores are constructed from high-impact plastics or brass. Over-tightening can gall or strip the threads, especially if dirt or grit is present. This makes the valve difficult to remove and reduces its ability to hold pressure.
Flange Delamination: The most expensive failure. When an operator uses a wrench or pliers to tighten a valve, the leverage can twist the flange against the fabric, breaking the chemical or weld bond. Repairing a delaminated flange is a significant undertaking.
Core Damage: In Schrader-style valves used on some high-pressure gear, over-tightening the core can compress the internal seal, causing the valve to stick open or leak.
| Valve Component | Failure Mechanism | Diagnostic Check | Torque/Service Action |
|---|---|---|---|
| Dust Cap | Gasket deformation causing hairline leaks | Listen for hissing; visual check for a flattened or cracked gasket | Replace gasket or cap; torque to 2.5-3.5 Nm |
| Valve Core (Schrader/Leaf) | Internal seal compression; stuck open/closed | Check if core holds pressure independently of cap | Remove and inspect core; replace core (typically 3.0-4.5 Nm) |
| Flange Adhesive/Weld | Delamination; fabric micro-tearing | Visual inspection for lifting or wrinkles around valve base | Professional repair; replace valve if separated; stop over-tightening |
| Threads | Stripped or galled threads on cap or body | Cap spins or fails to engage tightly | Replace cap or valve body; lubricate O-ring; never force cross-threads |
Establishing a Torque Protocol for Commercial Fleets
For commercial operations, eliminating the guesswork and subjective feel of hand-tightening is essential. A standardized torque protocol protects your assets and ensures consistent pressure retention across your fleet.
The first step is to identify the valve type used on your equipment. Most suppliers provide a recommended torque range in the technical datasheet. If not, the typical commercial range for cap and core installation on inflatable gear is 2.5 to 4.5 Nm (Newton-meters). This is often described as "finger-tight plus a quarter turn with a tool." However, for B2B operations, using a small torque wrench—even a basic one—is the best practice.
Torque Specifications by Valve Class
It is important to distinguish between the valve core and the valve cap. The core (the one-way mechanism) often requires a specific torque setting to ensure the seal is seated correctly. The cap generally requires less torque. Using the correct size of valve wrench is also critical. Using oversized pliers can easily exceed the recommended Nm limit without the operator realizing it.
Remember, the torque specification is a maximum. If the valve is leaking at the correct torque, the issue is likely a faulty seal or a damaged flange, not a loose cap. Tightening it further will only exacerbate the underlying problem.
Inspection and Quality Control in Valve Maintenance
Integrating valve checks into your standard operating procedures (SOPs) is critical for reducing downtime.
Pre-Deflation Inspection: Before deflating equipment, listen for hissing. If a valve hisses when the cap is on, the primary seal is compromised. Mark the equipment for service.
Lubrication: The O-ring or gasket should be lightly lubricated with a silicone-based grease approved for the valve material. This prevents galling and ensures a proper seal, removing the operator's temptation to over-tighten to force a seal.
Damage Reporting: Train staff to visually inspect the valve flange for cracking or separation during every setup and takedown. Early detection of a delamination can often be addressed in the repair shop before it leads to a catastrophic failure in the field.
Conditional Recommendation: If you are operating in cold-weather environments where materials become brittle, reduce the maximum torque target by 20% to account for reduced flexibility of the plastic and fabric components.
Repair-or-Replace Decision for Valves
When a valve fails, the decision is usually straightforward. If the cap or core is stripped or the gasket is damaged, simply replace the component. These are low-cost spare parts. However, if the flange or the surrounding fabric is compromised, the repair becomes more intensive.
A flange delamination requires professional repair: cutting the old valve out, prepping the fabric, and welding or gluing in a new valve. For drop-stitch materials, this requires precise temperature and pressure control. For many commercial operators, sourcing a pre-made repair patch with an integrated valve is a faster and more reliable field-fix solution.
Buyer Checklist for Valve Specifications
When procuring new inflatable gear, apply this checklist to the valve specification.
Verify the Valve Material: Ensure the valve body and cap are constructed from UV-stabilized materials. High-quality acetal or brass provides better longevity than cheap nylon.
Check the O-Ring Material: Nitrile or silicone O-rings are common. Nitrile offers superior resistance to oils and fuels, which is critical for marine applications where the gear may be exposed to oily bilge water.
Clarify the Torque Spec: Ask the supplier for the recommended installation torque for the cap and core. Record this figure in your maintenance manual.
Assess Accessibility: Does the valve need to be replaced in the field? If so, ensure the valve design allows for easy removal of the core with a standard tool.
Spare Parts Availability: Ensure the supplier can provide bulk packs of caps, cores, and O-rings. Stocking these items reduces downtime dramatically, as changing a cap or core takes seconds.
Conclusion: Hand-Tight is Not a Specification
The leading cause of valve failure in commercial inflatable gear is not wear and tear; it is human error. Relying on hand-tightened valves or guessing the torque is an operational risk. By adopting a simple torque specification, utilizing the correct tools, and training staff on the valve's mechanics, you can extend the service life of your equipment significantly.
Treat your air valves as precision components. They are the lifeline of your inflatable asset. A spare valve kit and a small torque wrench are among the highest ROI investments a rental operator or facility manager can make. They protect your fleet from a failure that is 100% preventable.