

The Problem: A Jammed Valve Stops Revenue
For commercial inflatable equipment—whether rental SUPs, water park docks, or rescue rafts—a jammed air valve is not a minor nuisance. It is a direct hit to utilization. A single valve failure can ground a unit during peak demand, turn a routine pre-rental inspection into a repair bay project, and erode operator confidence. Unlike a slow leak, which might be manageable, a jammed valve often prevents inflation or deflation entirely, making the product unusable. This article addresses the specific question: What causes air valves to jam, and how can you lubricate them safely to maximize fleet uptime?
We will move beyond generic advice to examine the real-world failure modes of common commercial valve types—including Halkey-Roberts, Leafield, and military-style bayonet valves—and provide a practical, safe lubrication protocol that protects both the valve seat and the downstream air system.
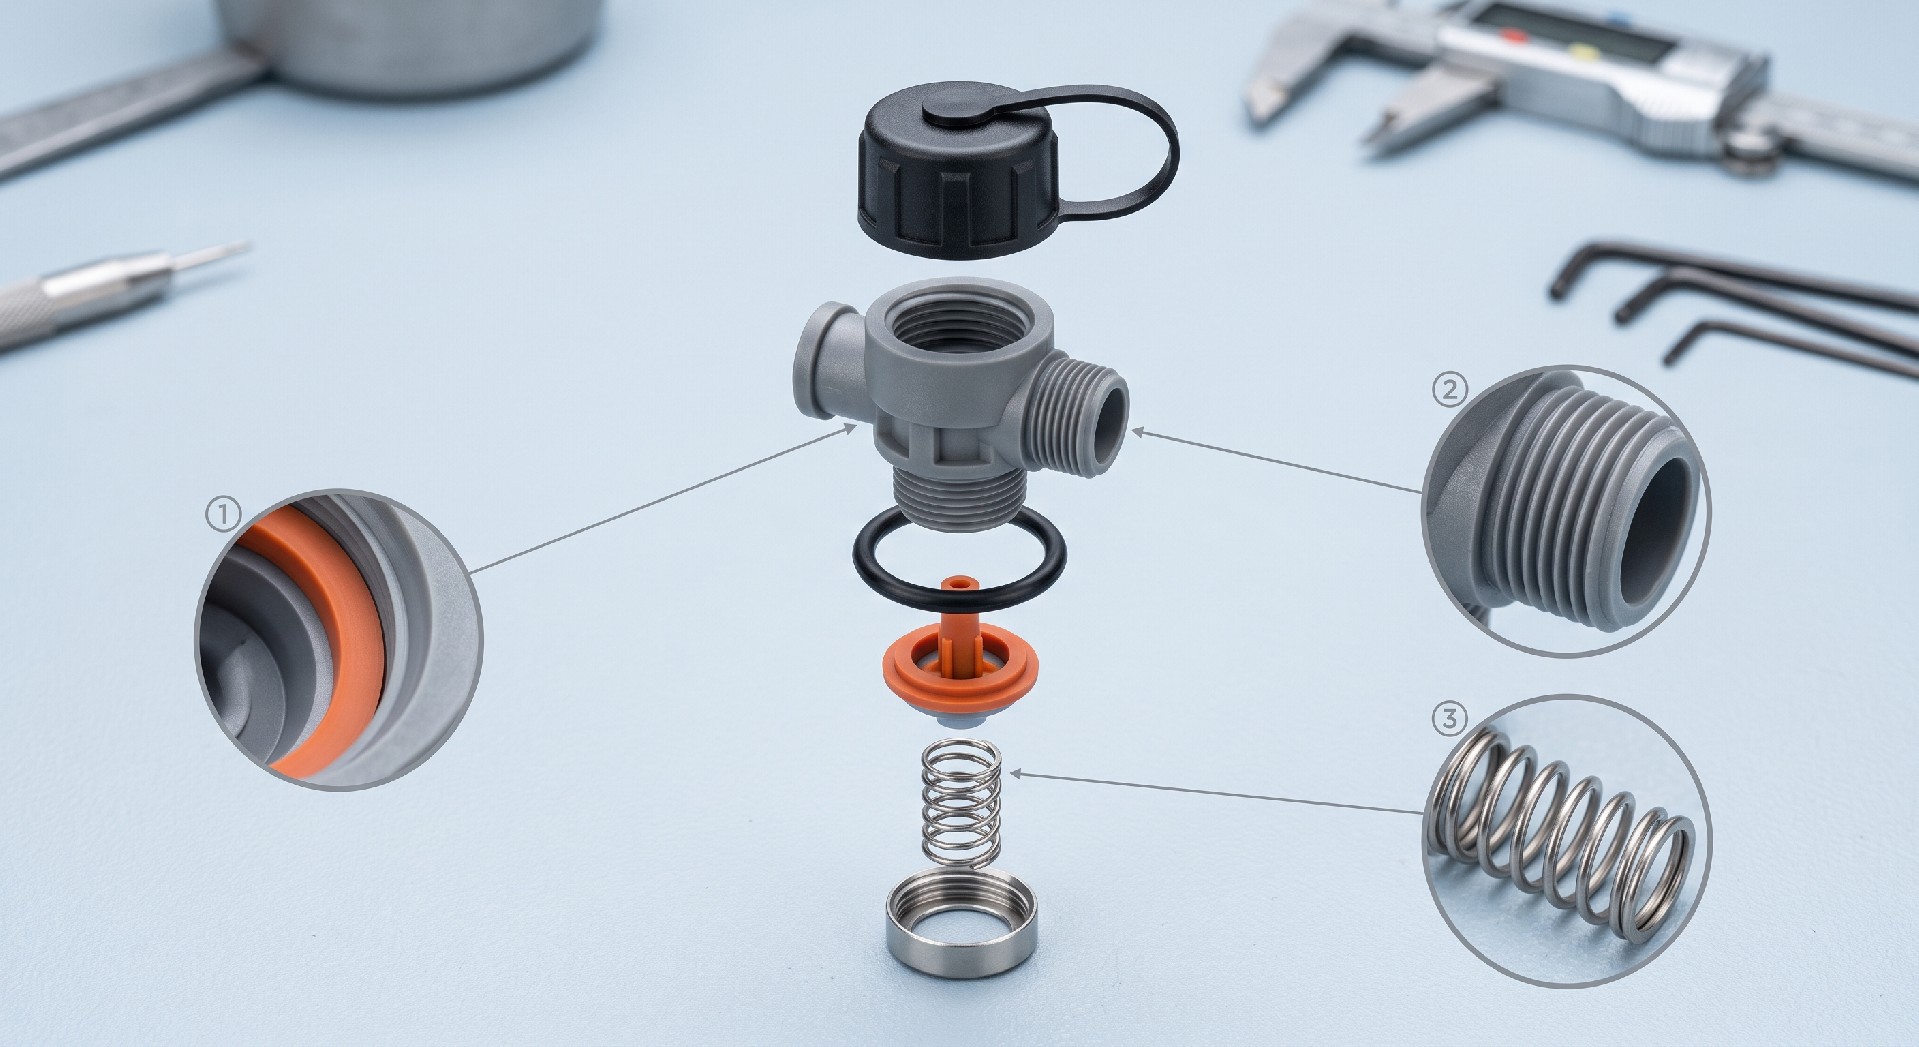
Understanding the Valve: The Interface Between Blower and Bladder
The air valve on an inflatable product is a precision mechanical interface. It must seal against internal pressure—often 8-15 PSI for drop-stitch docks and rigid inflatable boats—while allowing rapid airflow during setup and breakdown. Most commercial valves share a common architecture: a spring-loaded poppet or a floating seal that is lifted by the pump connector or adapter. The valve body is typically a high-grade engineering plastic like acetal or nylon, chosen for its dimensional stability and resistance to UV degradation.
When this mechanism functions correctly, the seal creates an airtight lock. When it jams, the poppet fails to return to its seat, the threaded sleeve binds, or the retaining ring seizes. The consequences range from slow deflation during an activity to complete inability to inflate. Understanding the precise failure mechanism is the first step toward effective maintenance.
Common Failure Modes: Why Valves Jam
1. Contamination and Debris
In commercial environments, inflatables are deployed on beaches, lakes, and event fields. Sand, dust, and organic matter inevitably find their way into the valve mechanism. Over time, abrasive particles abrade the sealing surfaces or jam between the moving components and the valve body. This is particularly problematic for poppet valves, where even a 0.1mm granule can prevent the seal from fully seating or the spring from returning to its neutral position.
2. Corrosion and Oxidation
Valves incorporate metallic components: the spring is often stainless steel, while some adapters and retaining rings may be brass or plated steel. In saltwater environments, galvanic corrosion can occur, especially if the valve body is a dissimilar plastic and the fastener hardware is not adequately protected. Corrosion products, which are brittle and voluminous, can flake off and lodge in the valve guide, causing mechanical binding. Additionally, oxidation of the sealing surfaces, particularly if the O-ring or seal is of a lower-grade rubber, can make the component brittle and tacky.
3. Lubricant Degradation and Cross-Contamination
This is a paradoxical failure. Many operators apply a silicone or petroleum-based lubricant to improve sealing and smooth operation. However, incorrect lubricants can degrade the valve's elastomeric seals, causing them to swell, soften, or harden. When the seal softens, it can extrude into clearances and jam. When it hardens, it loses compliance, and the valve may stick. Furthermore, an over-application of lubricant can attract and hold dust, creating a viscous grinding paste that accelerates wear.
4. Mechanical Stress and Over-Torque
Valves are mounted to the fabric via a base plate and retaining nut. Over-tightening this nut during installation can distort the valve body, misaligning the poppet guide. Similarly, using an adapter that is slightly out of specification can apply side-load to the poppet, causing it to bind in its bore. Repeated aggressive insertion of the pump adapter can also peen over the edges of the valve's lifting mechanism.
| Failure Symptom | Likely Cause | Diagnostic Check | Corrective Action |
|---|---|---|---|
| Valve will not open (cannot deflate) | Poppet or spring seized by corrosion or debris | Attempt to manually lift the poppet with a non-metallic tool. Check for debris. | Clean with a soft brush and apply silicone grease. If seized, replace the valve core. |
| Valve will not close (slow leak) | Debris or degraded seal preventing poppet from seating fully | Press down on the poppet to feel for spring return. Inflate and apply soapy water to the valve. | Remove, clean, and lubricate the seal. If the O-ring is hard or cracked, replace it. |
| Threads are stiff or cross-threaded | Mechanical damage or sand in the threads of the adapter or retaining nut | Inspect the threads visually for burrs or deformation. Attempt to thread a known-good adapter. | Clean the threads with a brush. Apply a thin coat of silicone grease. If damaged, replace the valve body or adapter. |
| Valve leaks from the base (mounting area) | Base plate loose or seal between valve and fabric has failed | Apply soapy water to the base of the valve while inflated. Check for movement or gap. | Tighten the retaining nut to the recommended torque. If the seal is damaged, the valve may need removal and reinstallation with new sealant. |
Safe Lubrication: A Step-by-Step Protocol
Lubrication is not a cure-all, but when done correctly, it reduces friction, prevents corrosion, and extends seal life. The key principle is to use the correct type of lubricant—designed for rubber and plastic components—and to apply it sparingly to the appropriate areas.
Selecting the Right Lubricant
Reject all petroleum-based lubricants (including WD-40) for the valve mechanism. These can attack the polymer base of many valve seals. Also, avoid heavy greases that are prone to gumming. The preferred lubricants for commercial inflatable valves are:
Silicon Grease: A pure silicone-based grease is chemically inert, does not swell most elastomers, and remains stable over a wide temperature range. It is available in small tubes designed for scuba gear or plumbing applications.
Dielectric or O-Ring Lubricant: This is a specialized silicone compound used in electrical and automotive applications. It is ideal for the O-rings and seals within the valve.
Dry Film Lubricants: In dusty environments like deserts or indoor sports arenas, a PTFE-based dry film lubricant can be applied to the valve body. It leaves a microscopic layer of lubricating particles that do not attract dust.
Lubrication Procedure
Inspect and Clean: Before applying any lubricant, inspect the valve for physical damage. Use a soft brush and a lint-free cloth to remove visible debris. If the valve is particularly contaminated, use a mild, non-abrasive soap solution and rinse with fresh water. Allow it to dry completely.
Apply Sparingly: The proper amount of lubricant is often described as a ‘smear’. Apply a small amount to a clean fingertip or a cotton swab. Wipe the lubricant around the O-ring or seal surface. Also, apply a thin coating to the poppet stem and the valve body threads. There should be no visible excess or pools of grease.
Exercise the Valve: Operate the valve manually several times to distribute the lubricant evenly across the moving parts. This ensures the lubricant reaches the contact surfaces and that the mechanism moves freely.
Wipe Off Excess: After exercising the valve, wipe away any lubricant that has been pushed out of the mechanism. This prevents dust accumulation.
Pressure Test: Inflate the product to a typical operating pressure (e.g., 8-10 PSI for a paddleboard). Apply a soapy water solution to the valve base and the sealing interface. Look for bubbles, which indicate a leak. If the seal is compromised, the valve may require disassembly and inspection.
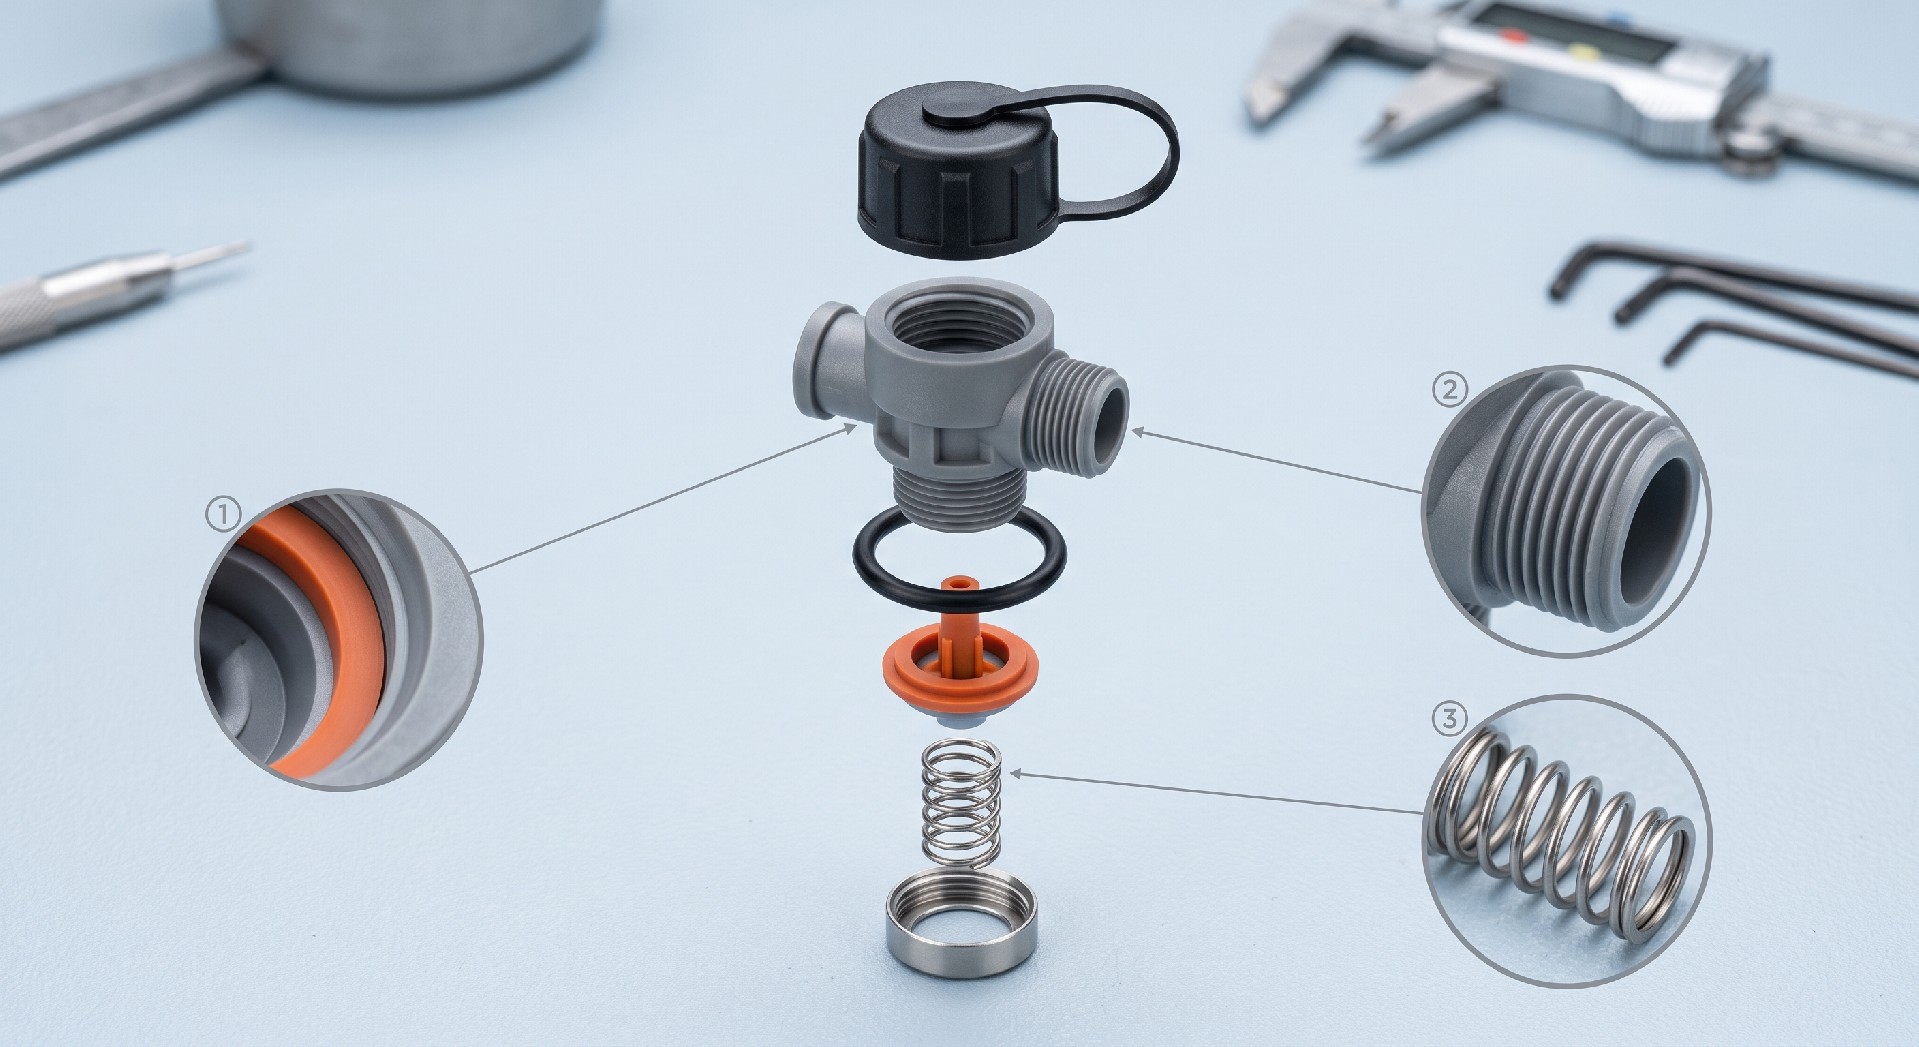
Preventive Maintenance: A Commercial Operator's Checklist
For B2B operators, reliance on reactive maintenance is expensive. A scheduled preventive routine is the most effective way to reduce downtime. This checklist should be integrated into your weekly fleet inspection.
Weekly Visual and Tactile Inspection: Check every valve for signs of wear, corrosion, or distortion. Operate the valve manually to feel for binding or grinding. Listen for a ‘click’ as the poppet returns to its seat.
Environmental Hardening: Rinse valves with fresh water after every use in saltwater or sandy environments. This simple step is one of the most effective corrosion and abrasion preventatives.
Lubrication Schedule: For high-utilization fleets, apply a silicone grease to the O-rings and moving parts every 20 inflations. For seasonal or lower-use equipment, perform the lubrication procedure before the start and mid-way through the peak season.
Spare Parts Stocking: Maintain a stock of valve repair kits or replacement valves. These are a low-cost item relative to downtime. A typical repair kit includes a new O-ring, spring, and sometimes a poppet. The ability to swap a valve core in the field can turn a 2-hour repair into a 10-minute maintenance task.
Keep a Log: Track valve failures by unit and by time. A specific board or unit might have a manufacturing defect in the valve base or be deployed in an especially abrasive location. This data allows you to refine your maintenance schedule and potentially rotate units to equalize wear.
Repair vs. Replace: Making the Commercial Decision
When a valve jams, the operator must decide whether to attempt repair or to replace the valve entirely. This decision depends on the root cause and the equipment’s criticality.
Repair is typically viable when: the cause is a simple binding due to a lack of lubrication or a minor external contamination. If cleaning and lubricating the valve restores smooth operation and it holds pressure, the component can continue in service.
Replace is the safer choice when: the corrosion has pitted the metallic components, the spring is weakened, or the valve body is deformed. A valve that has been cross-threaded or damaged by an incorrectly sized adapter is beyond repair and should be replaced. Additionally, consider that a valve core replacement kit is often a fraction of the cost of a new valve and can be installed without replacing the base plate that is glued to the fabric.
For commercial buyers procuring new equipment or replacement valves, the specification should emphasize durability. Look for valves with stainless steel springs, UV-resistant plastic housings, and certified sealing materials that offer resistance to ozone, UV, and a wide temperature range. Always request a sample to test with your standard pump adapters.
The total lifecycle cost of a valve is not just its purchase price. A robust valve that withstands 5,000 cycles with minimal maintenance is a better investment than a cheap valve that fails after 500 cycles. This is a classic case where the cheapest option is rarely the lowest-cost option for a commercial operator.
Conclusion: A Spec-Centric Approach to Fleet Reliability
Jammed air valves are a solvable problem. The solution lies in understanding the specific mechanical vulnerabilities of your equipment’s valves, implementing a disciplined cleaning and lubrication protocol using inert silicone-based compounds, and stocking critical replacement parts. A proactive maintenance strategy reduces the cost of downtime and extends the operational life of your commercial inflatable assets.
For procurement teams and rental operators, the final recommendation is to incorporate these maintenance specifications into your supplier requirements. Request that your OEM supplier provide a detailed maintenance manual and ensure that replacement valves and repair kits are available as standard spare parts. Ultimately, the performance of the whole product rests on the reliability of this small but critical component.